1. Requirements
In order to follow this guide, you will need:
-
A computer with an existing installation of Eclipse Integrated Development Environment (IDE) or internet connection and permissions to download and install it. This is explained later in the guide.
-
Basic Java development skills
-
The Prosys OPC UA SDK for Java distribution. This is provided as a .zip file.
Not all operating systems by default show file endings, thus you might not see the .zip-ending, but anyway we mean the 'prosys-opc-ua-sdk-for-java-VERSION-EDITION.zip' file.
2. Introduction
The purpose of this guide is to setup a "my first Java project" (i.e. the SDK samples) within Eclipse. If you are an experienced Java developer, you can probably skip most of the tutorial and read the README, javadocs and the other SDK tutorial for more specific details about the SDK itself.
If you know and use Apache Maven, see Maven integration for more information.
|
This guide will setup a simple Java development environment directly using Eclipse. You might wish to eventually learn one of Build and dependency management tools, such as Apache Maven or Gradle. Most Java projects nowadays use either of the two. However, they do have a learning curve and are considered outside of this tutorial. Once you wish to build your application outside of Eclipse or have multiple people in the team using different IDEs, it is recommended to learn one. |
3. Tools for Java Development
This section contains info about the required software for Java development. If you are an experienced Java developer, you can probably skip to the next chapter.
3.1. Eclipse Integrated Development Environment (IDE)
Java is one of the programming languages that needs good tooling to be productive. Luckily, it also has very good tools. Thus, except for some very specific cases (you would/should already know everything this guide has to offer), it is extremely heavily recommended that you use an Integrated Development Environment (IDE) to write your own Java applications instead of a bare text editor.
An IDE typically offers a lot of support:
-
Auto-completion (Java tends to have long names; auto-complete avoids the need to type everything manually).
-
Following code paths (Java doesn’t need any ordering function declarations, or methods as they are called in java) thus navigating manually can be hard (each Class is also in their own file as well). In general you should not be scanning a file manually from method to method, but use IDE shortcuts and commands to move around. Also there is typically an 'Outline' view of all the methods of a given class file you have open, that should be used instead whenever you look for a method.
-
Displaying (java)docs to see documentations of classes and methods.
-
Compiling fast while you are typing and saving to spot errors early and offering suggestions for fixes.
-
Finding all the places a method is called.
3.1.1. Eclipse
This guide uses Eclipse as the example IDE. It is free and open source. The reason for selecting Eclipse is that the writers of this guide have the most experience with it, but you should try out other IDEs as well. The main point is that you use one. It is outside the scope of this tutorial to teach Eclipse, other than making the project. You can download and install from the Eclipse website. On the Download page, or if using the installer one, select the "Eclipse IDE for Java Developers" one.
| Current Eclipse versions only support 64-bit operating systems, including AArch64-based Linux/macOS. If you are on 32-bit Windows, you might be able to use an older version of Eclipse. |
| It is recommended to read Eclipse code navigation and basic shortcuts. Please at least do once you start looking at the samples and coding. Menus and right-click context menus can be used, but in general it is a lot faster to do so via shortcuts. |
| Other popular IDEs are the IntelliJ IDEA and the NetBeans IDE. |
3.2. Java Runtime Environment (JRE) and Java Development Kit (JDK)
Modern Java applications typically come with a JRE bundled as part of the application, thus even the fact that it is a Java-based application becomes implementation details. However, for developing them you would typically require a JDK to compile them. Eclipse is a Java program by itself and requires a JRE to run, but depending on the version and installation method it might also come with a bundled JRE.
Eclipse also comes with it’s own compiler, so technically you do not need a JDK to start out (typically the javac compiler is part of a JDK), however, in general you will most likely need one at some point. You can look at Selecting Java version at end of this guide when needed, also do that if your Eclipse installation wont start. If you want to run your application outside of Eclipse, you will also most likely need to do this.
3.3. Build and dependency management tools
Modern Java project uses some kind of tool for building the final package of the project (to be used by users or as a dependency to another project). The same tool is usually handling all the dependencies (and the dependencies of the dependencies) that the project might have.
This guide ignores this part and instead stops at the point where you can run the samples provided in the SDK package from Eclipse. Build paths are configured manually. However, learning to use these tools is eventually very recommended (they all have their advantages and disadvantages and having a basic understanding of all of them might be beneficial). Basically with these you would typically just type what dependency name and version you would need, and the IDE integration with the tool would handle the rest.
|
Common tools in this category are:
|
3.4. Version control software
The last piece is a Version control software. However, using one is outside of the scope of this tutorial, but it is important enough that you use one to be still mentioned. Using one will allow you to go back to an older versions of your code. Eclipse has limited history information while it is running, but it is lost once you shut down the application.
Common tools in this category are:
|
Common tools in this category are: |
In general the authors of this guide recommend Git, it is the most used and recognized one. It is extremely likely that if a company is using a version control (and everyone should!), it is nowadays Git. SVN and CVS are more historical ones, it is possible to encounter them on more legacy projects, but anything new should use Git. Though, it might have a bit more learning curve. Basically use whatever your workplace or school provides you, it is important that you have also stored the info outside of your computer in the case of hardware failures. Also typically the version control software is also the way multiple people work on the code and handle code reviews and so on.
4. Using the Prosys OPC UA SDK for Java in Eclipse IDE
This chapter demonstrates how to create a new Java project in the Eclipse IDE and how to import the Prosys OPC UA SDK for Java into the project so that you can easily get started on testing the features of the SDK. After completing the steps in this chapter, you should be ready to go through the tutorials for developing OPC UA applications found next to this guide in the SDK distribution package.
| The step-by-step instructions provided in this chapter are based on Eclipse 2022-09 Release (4.25.0) running on Windows 10. The steps might be slightly different on other versions of Eclipse or in other operating systems. |
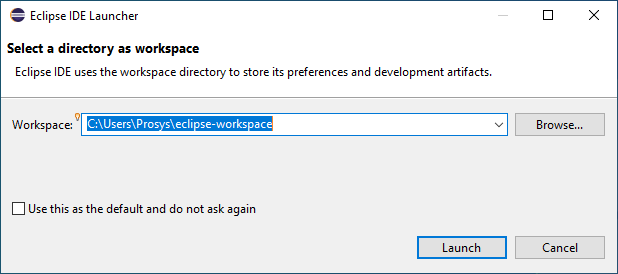
4.1. Eclipse first start and creating a workspace
When you first start Eclipse, you’ll be asked to create a so called workspace folder:
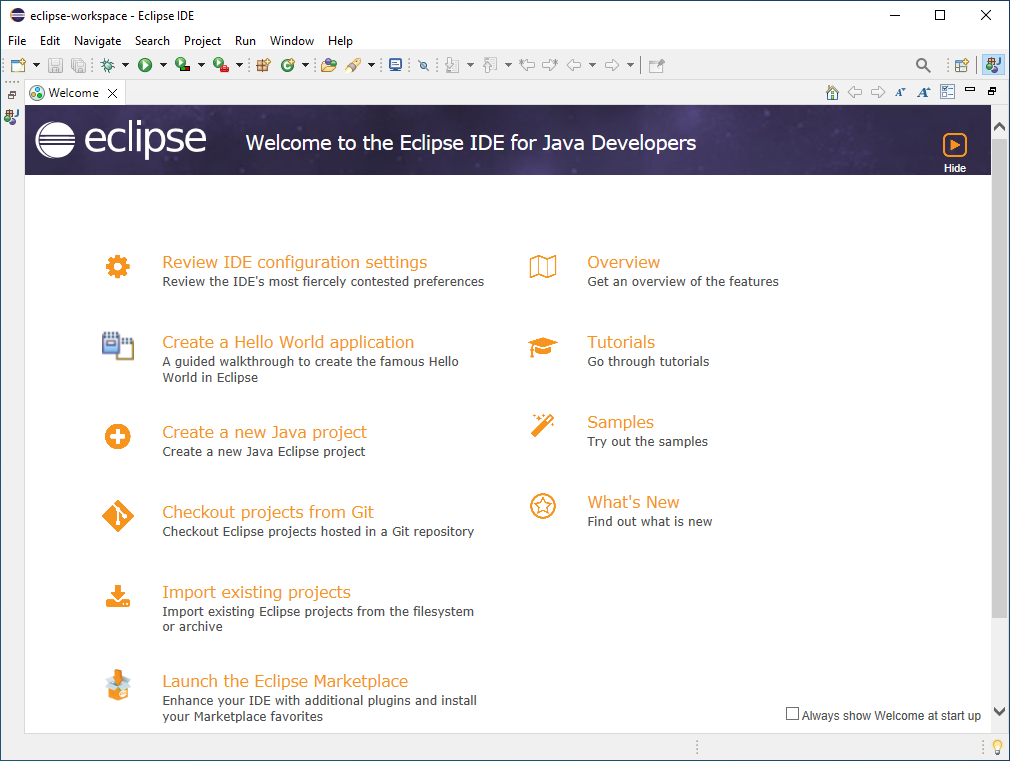
You’ll be treated with a welcome tab, which you can close.
4.2. Creating New Java Project
To create a new Java project for using the SDK in Eclipse, follow the steps below:
-
Go to the
Filemenu and clickNew→Java Project. Alternatively since there are no projects, the 'Package Explorer' on the left will have a shortcut to do this.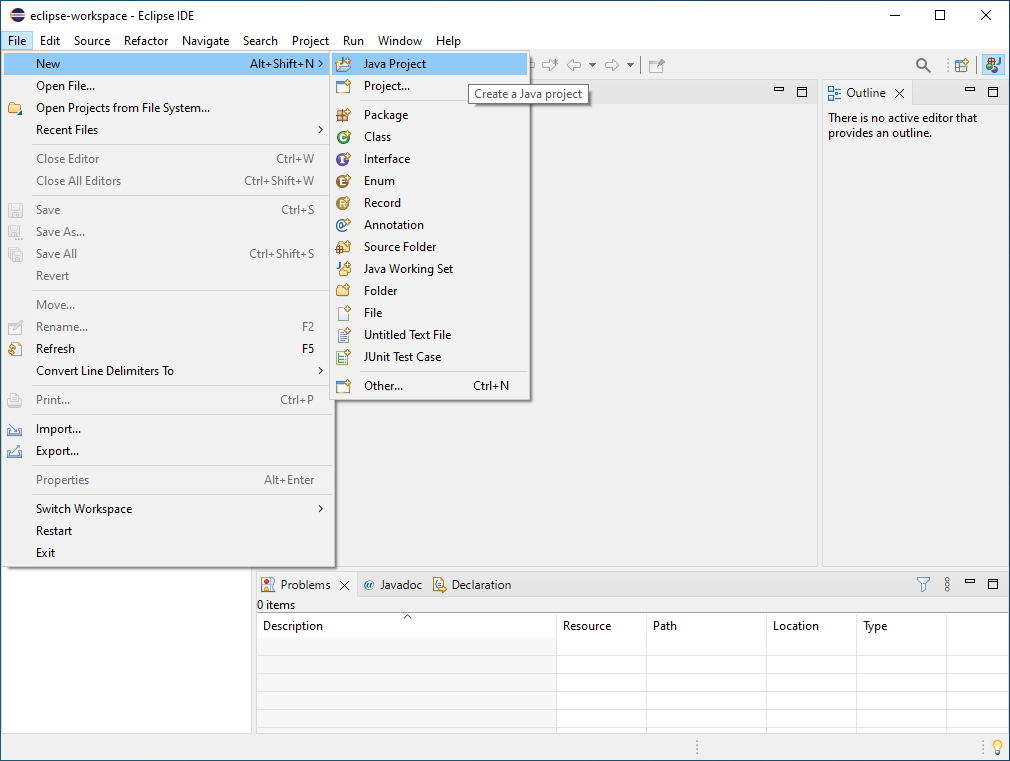 Figure 3. New Java Project.
 -
Uncheck the 'Create module-info.java' checkbox at the bottom.
Newer Eclipse versions will by default create a module-info.java file if on Java 9+. The SDK has not been tested in so called "module path" (compared to the traditional "class path"), and it is outside of this tutorial to try use or explain the Java Module system. Thus, in this tutorial we uncheck the 'Create module-info.java file' in the 'Module' section and not use the Java Platform Module System. In practice you can basically forget that it exists. 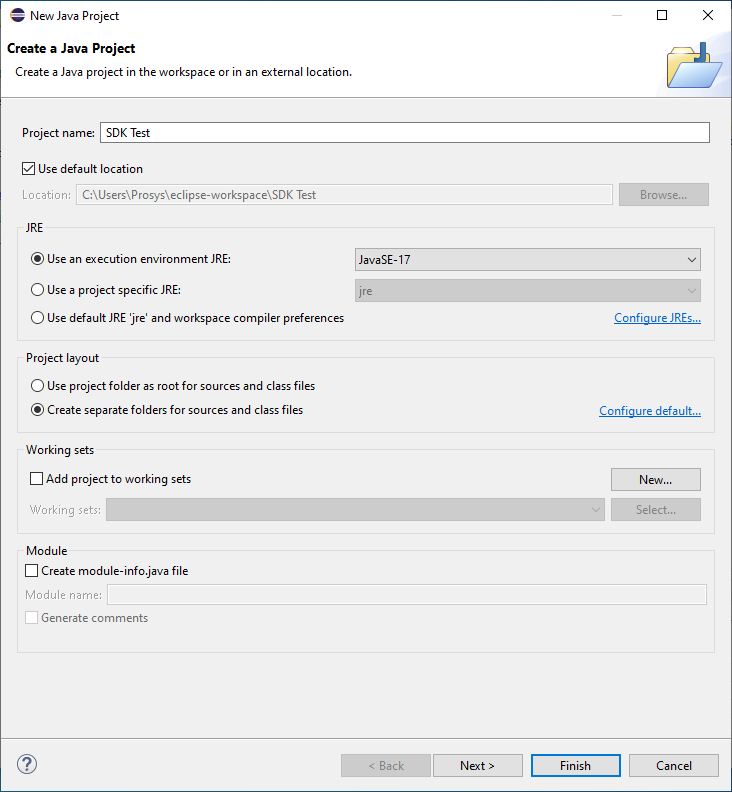 Figure 4. Settings for new Java project.
 -
Enter a
Project name, e.g. "SDK Test". -
The
Use default locationcheckbox is enabled by default and points to the Eclipse workspace, which is suitable for this tutorial. You may untick the checkbox and define another location where the project will be saved. -
The other settings are fine with their default values, press Finish.
4.3. Importing the Prosys OPC UA SDK for Java
After creating a new empty Java project in Eclipse, follow these steps to import the required SDK files to the project so that you can start testing the functionality:
-
Open the project folder (either in Eclipse or your operating system’s file manager).
You can use the 'Show In → System Explorer' menu action to open the project folder. 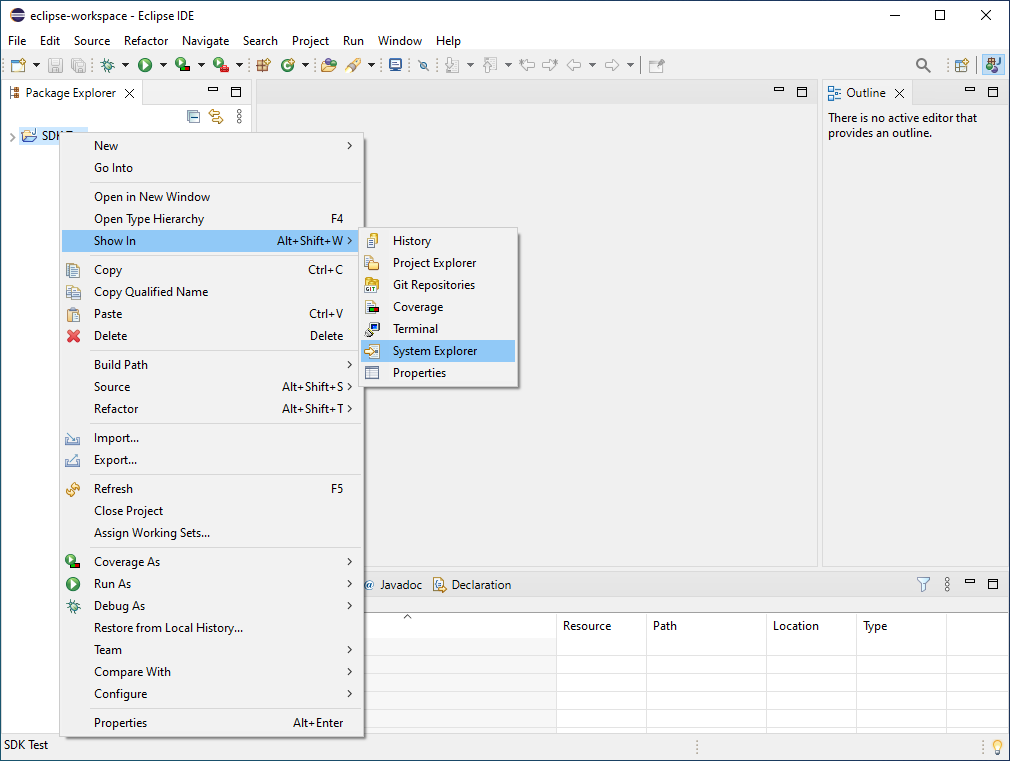 Figure 5. Open in System Explorer menu action.
 -
Create two new folders called
libandjavadocat the project root folder. Asrcfolder should already be created, but if not, then create it as well.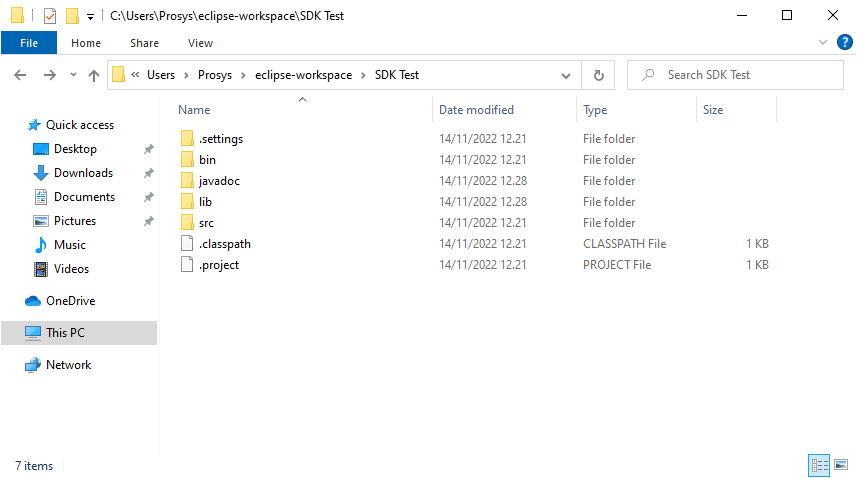 Figure 6. Project root folder.
 -
Copy the contents of the
samples/sampleconsoleserver/src/main/javaandsamples/sampleconsoleclient/src/main/javaof the SDK package into thesrcfolder (no need to copy the .bat, .sh and pom.xml files from the base folder). You can replace the files in the destination if prompted.The available samples depend on the SDK edition. The evaluation edition has all samples, but otherwise only the samples that could be run are included. This tutorial shows 'sampleconsoleclient' and 'sampleconsoleserver' examples, but the "pubsub" examples can also be added the same way. Also, for simplicity sake, they are imported to the same project, but in a typical case you would have a different project for each. -
Copy the contents of the
libfolder of the SDK package into thelibfolder of the project. -
Copy the contents of the
javadocfolder of the SDK package into thejavadocfolder of the project. -
If you did the operations in your operating system’s file manager, refresh the project in Eclipse (by selecting it and either pressing F5 or via right-click menu). At this point it is normal to get a warning for each file, because we have not yet added the libs to the so called 'Build Path'.
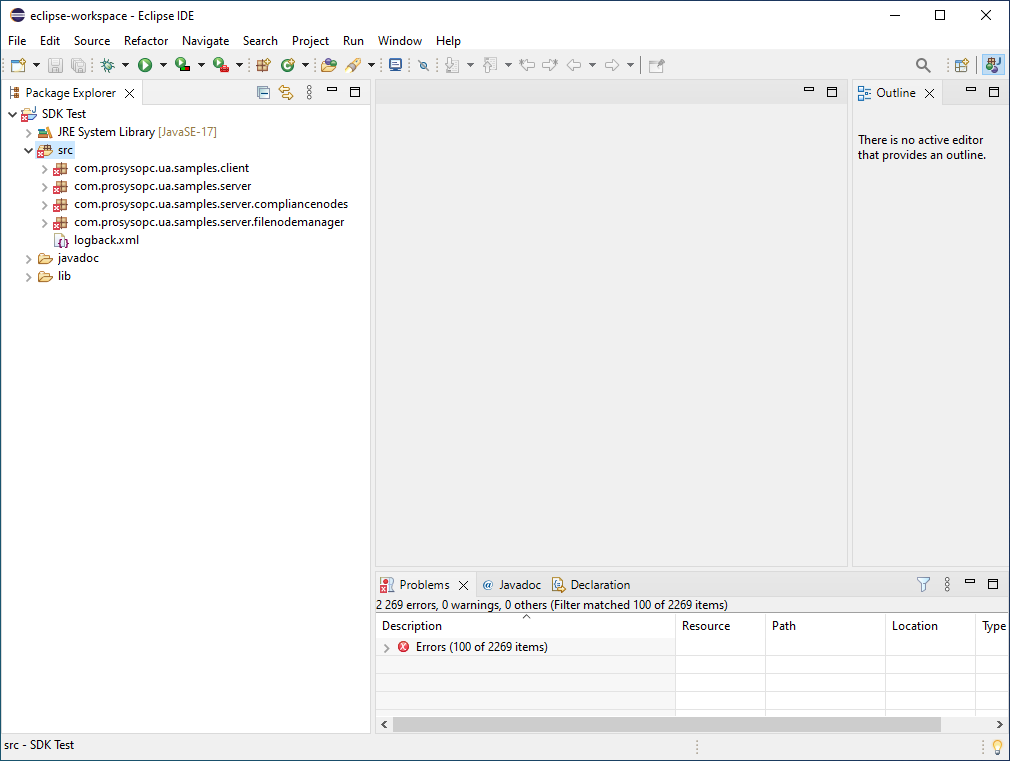 Figure 7. View of the Eclipse Package Explorer after adding the required files to the project folder and refreshing the project.
 -
Add each file from the
libfolder to the projectsBuild Path(select one or more and right-click and clickBuild Path→Add to Build Path).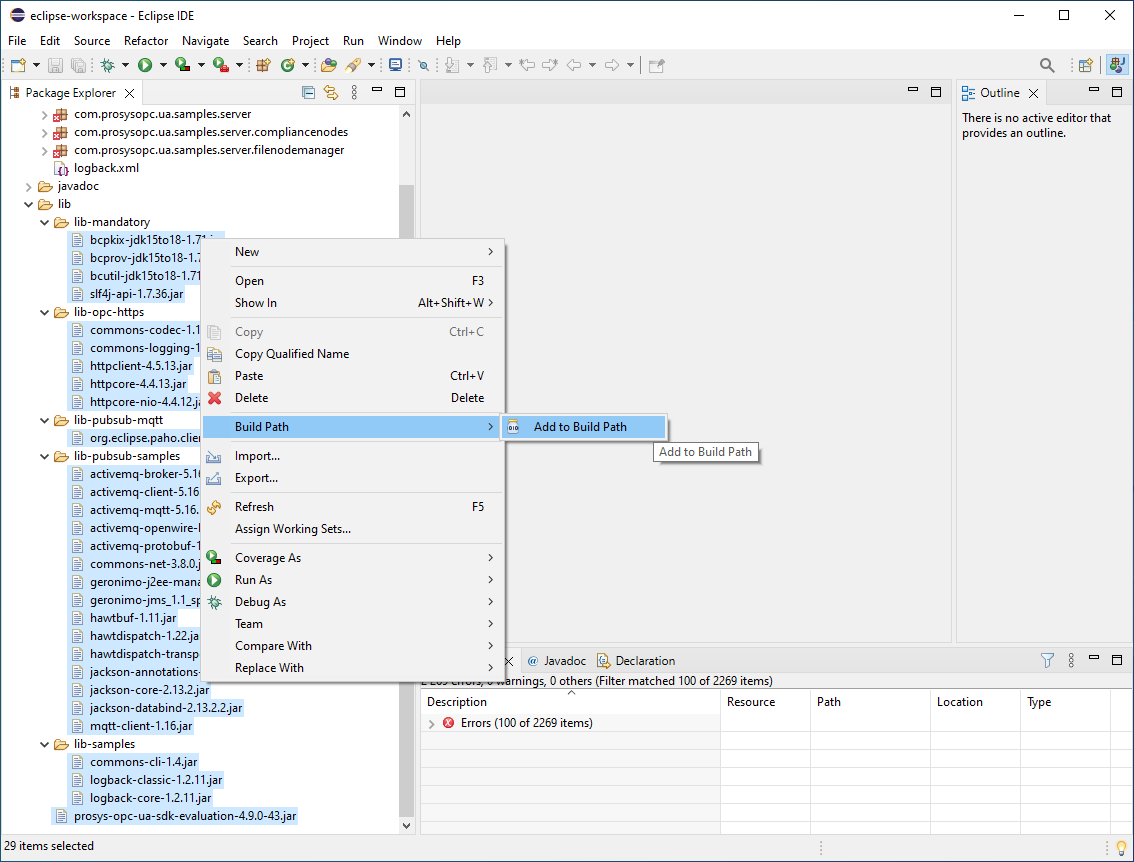 Figure 8. Add library to Build Path.
 -
Finally, you can expand the
srcfolder and find the SampleConsoleClient and SampleConsoleServer Java classes. You can run these by right-clicking them and selectingRun As→Java Application.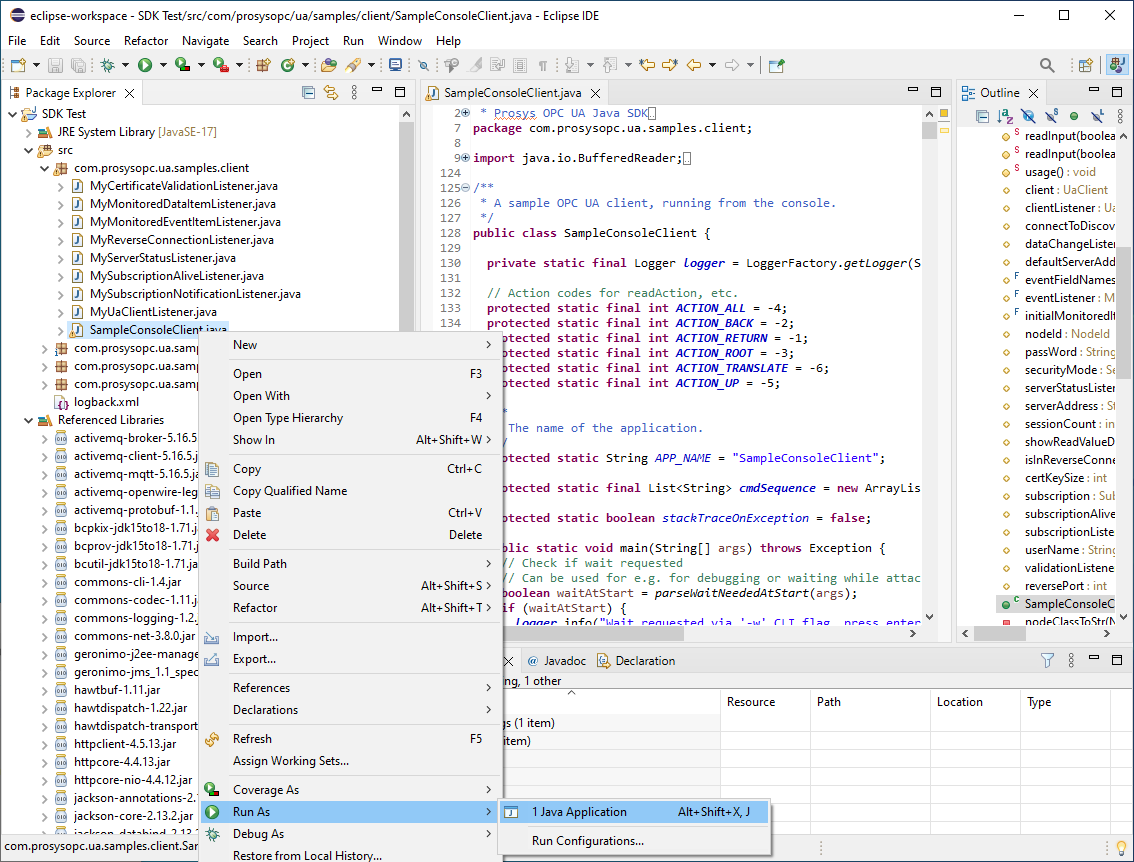 Figure 9. Running the sample application.
4.4. Adding Javadoc documentation
For development, it is highly recommended that the Javadoc code documentations are attached to the provided libraries. The SDK package provides Javadocs for the Prosys OPC UA SDK for Java. The Javadocs can be attached to their respective libraries in Eclipse with these steps:
-
Right-click on the SDK library in the
Referenced Librariessection of the EclipsePackage Explorer. -
From the pop-up menu select
Properties.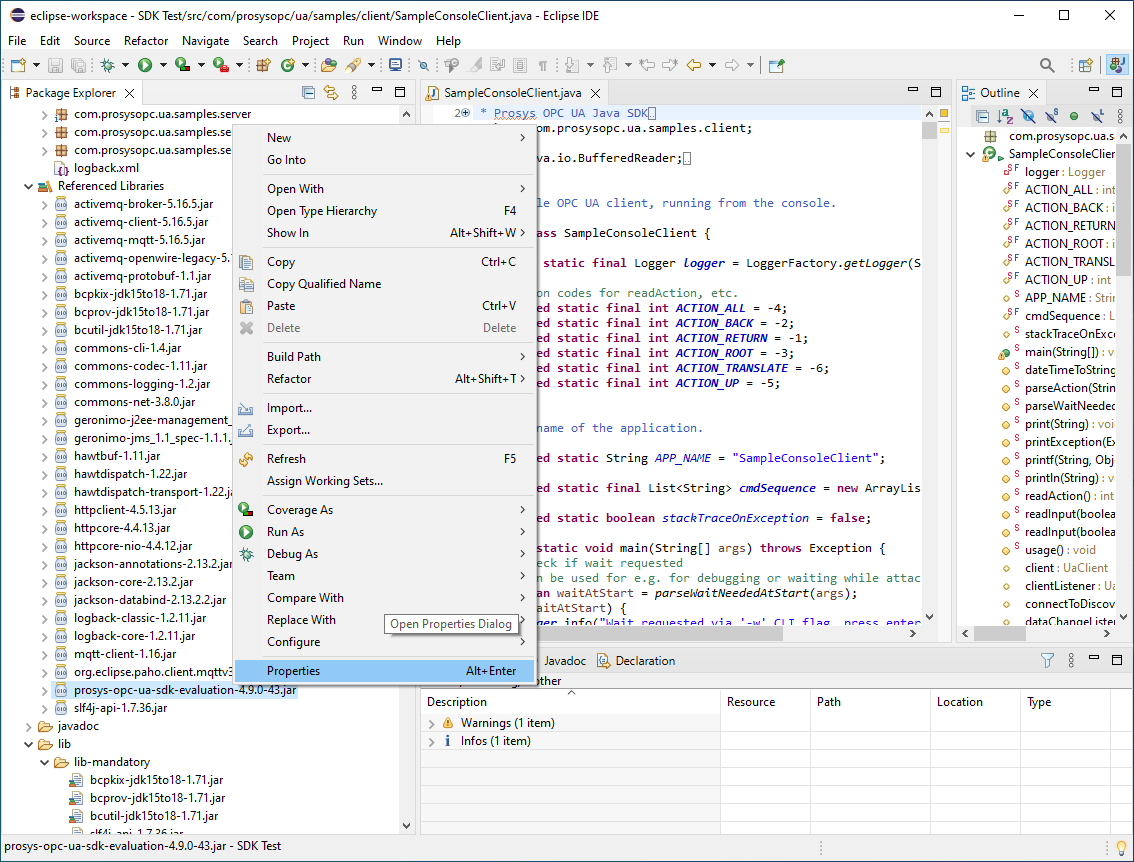 Figure 10. Library Properties.
 -
Click
Javadoc Locationfrom the left-side menu. -
Select
Javadoc in archive. -
Select
Workspace file. -
Click
Browsenext to theArchive path:field. -
Locate the
javadocfolder under the root folder (named according to what you defined in the beginning). -
Inside the
javadocfolder, you should click the Javadoc file that should be associated to the current library, i.e.prosys-opc-ua-sdk-client-server-evaluation-5.x.x-xxx-javadoc.zipfor the SDK. -
Click
OK. Figure 11. Setting the Javadoc for a library.
| The project structure created here is suited for testing out the SDK. In general, more advanced development typically uses some build tool, which usually follows some conventions on how the project folders should be organized. In addition, the libraries are typically not within a project folder, but instead they are linked by the dependency management tool (which is typically also the build tool). Furthermore, they also typically link the Javadocs from the same place where they link the libraries. The reason for this is that typically the project folder is in a version control system (e.g. Git) and putting binaries to it is not generally seen as a good idea (size grows large when new versions of libraries are released). Instead the library and Javadoc dependencies are declared in a file for the dependency management tool. |
5. Extra information
This section contains extra information, that are not 100% necessary for the purpose of this tutorial, but are still useful and can be referenced from other parts of the guide.
5.1. Eclipse code navigation and basic shortcuts
Before you start coding or even looking at the SDK samples, you should learn some of the basic IDE shortcuts. You can do this via Google or Youtube by searching "Eclipse shortcuts", but the most important ones are below. Obviously you can learn these on the go, but it is important to be aware of them.
-
You may wish to start with turning on "Toggle Show Key Bindings" via CTRL-3 Actions menu (at least on newer eclipses). Then whenever you do any action in the IDE via menus or shortcuts a popup will show in the lower part of the screen that will show the used shortcut. This way you can learn the shortcuts for an action you do. Also if you do any kind of tutorials etc. this will help the shortcuts usage be visible on a video.
-
'F3 (one of the "F-keys" on a typical keyboard right to the "Esc" key) or Ctrl-left click also works for this that will follow the code path to where-ever the cursor is. Thus you can "F3" a method, which will jump the editor (opening the target if different file) to the place where it is defined.
-
Ctrl-space, which is the autocomplete shortcut. You can write a few characters and the hit 'crtl-space' to see a popup of variable, method or class names. Java tends to have long names, thus this will avoid the need to type them in full. You can also trigger the autocompletion by pressing '.' after a variable etc., which will prompt all the methods you can call for the object.
-
"F4" will open a type view when the cursor is in a class, which will show all the subtypes of a given type, this is not needed as often, but is still useful.
-
If you have a mouse with back-forward thumb-buttons (or Alt-left/right arrow keys), you can use them to jump back to the previous place the cursor was, if you jumped around with "F3".
-
CTRL-1 (the number 1) will open suggestions for fixing errors.
-
Not a shortcut, but please use the 'Outline' view in the right side of the screen when searching a method, it is way faster than looking at the .java file.
-
CTRL-SHIFT-T, will open a dialog to open a type' source file (if you have sources), CTRL-SHIFT-R does the same for resource files; this can be useful when you know the type name, but do not have it written nearby (to "F3 into it").
-
CTRL-ALT-H, "Open Call Hierarchy" in the r-click menu, shows all places where a field or method is accessed (and this is a tree, that will then show where those are called etc.).
5.2. Selecting Java version
Nowadays there exists many so called "JVM vendors" (Java Virtual Machine vendors). Historically most Java developers did just use Oracle’s Java, but at some point moved away from it due to changes in Oracle’s licensing terms. Regardless of the current terms, it is probably just easier and safer to go with an OpenJDK instead. Choosing one of them is outside of the scope of this tutorial, but we have used https://adoptium.net/ ourselves. If you are running on Linux, you might be able to get OpenJDK directly from the Linux distribution.
Prosys OPC UA SDK for Java support Java versions from 8 to 25. In practice, we only test against the "LTS versions" (see below), and recommend those.
| Java is in general a very backwards compatible language, but version 9 introduced some compatibility-breaking changes. The biggest change was the introduction of the "Module path" concept, in addition to the traditional "Class path" concept. SDK is not tested with the Module path so you should leave the module-info out of your projects or find another way to deal with it. |
New Java versions are nowadays published every 6 months. Some of them are designed for Long Term Support (LTS) by some "JVM vendors" whereas the others are intermediate development versions (whose support typically ends when the next version is released). The SDK is tested only against the "LTS versions", although in general, it should work with the other versions as well. What Java versions are 'LTS' is vendor-specific, but usually it means versions 8, 11, 17, 21 and 25 (https://adoptium.net/support/). Note that the support for a larger version number might end earlier than for a smaller number.
5.3. Regarding exporting and making the application run outside of the IDE
You can Export the application/project as a runnable JAR file from Eclipse. Please check the README.txt at the base of the SDK distribution zip for more info about the dependencies for different use cases.
| IMPORTANT! Do not merge the BouncyCastle library into your application JAR. It is signed and cannot be repackaged (that would break the jar signatures, some JVMs wont load this). So you will need to distribute the BouncyCastle libraries together with your application jar and have them on the classpath to get properly loaded together with your application. |
5.4. Maven integration
If you already are using Maven or Gradle or anything that can consume Maven artifacts, see folder 'maven-integration' for more info (copied below). It contains the POM file for the SDK and a helper project to install it to the local Maven cache.
The folder 'maven-install-helper' contains a Maven project which can be used to install the SDK to your local (.m2) Maven repo/cache.
You will need to run 'mvn install' in the 'maven-install-helper' directory (or via your favorite IDE).
| SDK contains optional dependencies, please refer to the main README. However please note that the installed POM (from the 'data' folder) has all dependencies as mandatory, edit it before install if you wish to e.g. remove the optional libs required for OPC.HTTPS transport protocol. |
The SDK samples can be imported (they have a POM file and follow Maven Standard Directory Layout) as 'Maven projects' instead of the steps of Importing the Prosys OPC UA SDK for Java.